https://www.youtube.com/channel/UCAsLLKQeYXROHZz639sqz2A
Friday, 26 February 2021
Tuesday, 28 March 2017


Tuesday, 8 December 2015
Web Hosting On Go Daddy server to make your website Live:
https://www.youtube.com/watch?v=C8oykuBC0HA&t=2s
 2) Sign In with your user account credentials as below:
 3) After Logged In Click on “Web Hosting” Option and its “Manage” Button.
 4) On Clicking “Manage” Button you will navigate to below screen wheree again click on “Manage” button.
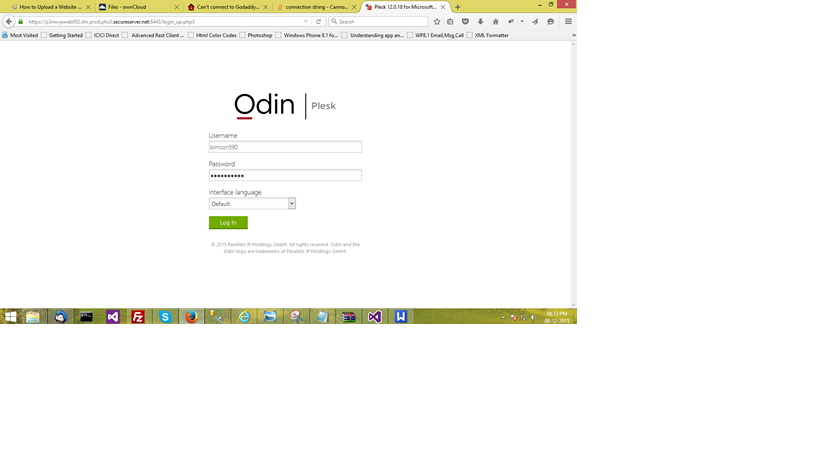
 5) After this you will navigate to below Odin/Plesk screen Login there with your credentials:
 6) After get Logged In you will navigated to below “Websites & Domains” screen:
 Here we can set our database and Upload published site files as well (published site files can also be kept by using FileZila software(optional)).
 Here you click on Webadmin link which navigate you to web interface screen to manage your database as below:
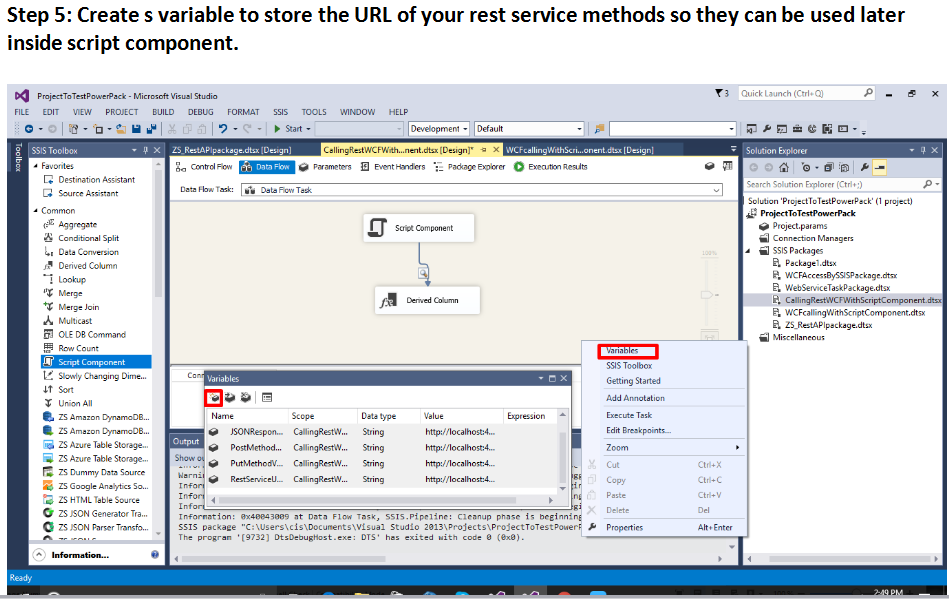
 8) here in Tools pane you find NewQuery option to run your database table scripts to generate tables with data and relationships.
 9) Uploading Pblished Files by first clicking on File Manager link:
 10) Then you will navigated to “File Manager” screen where you can Upload published files of your website inside a specific directory.
 Put your connection string of newly created database in the web config file of the application.
GoDaddy Web Hosting:
1) Browse GoDaddy official website url:
2) Sign In with your user account credentials as below:3) After Logged In Click on “Web Hosting” Option and its “Manage” Button.4) On Clicking “Manage” Button you will navigate to below screen wheree again click on “Manage” button.5) After this you will navigate to below Odin/Plesk screen Login there with your credentials:6) After get Logged In you will navigated to below “Websites & Domains” screen:Here we can set our database and Upload published site files as well (published site files can also be kept by using FileZila software(optional)).
7) Setting up database by firt clicking on Database link from above screen will navigate you to Databases screen below here also remember to set a default user for the database:
Here you click on Webadmin link which navigate you to web interface screen to manage your database as below:8) here in Tools pane you find NewQuery option to run your database table scripts to generate tables with data and relationships.9) Uploading Pblished Files by first clicking on File Manager link:10) Then you will navigated to “File Manager” screen where you can Upload published files of your website inside a specific directory.Put your connection string of newly created database in the web config file of the application.
Thats It ready to go Live...
Sunday, 30 November 2014
Hosting ASP.NET Web Application on IIS 7
Step 1: Control panel ->Programs -> Turn windows features on or off. Here, check all the IIS related options and press OK and then wait for couple of minutes.

Step 2: Type inetmgr command in start menu search option and press enter.

Step 3: Go to site -> default web site ->Add Application.

Step 4: Provide Alias and Physical path for your application.

Step 5: Select
Application pool and set it to ASP.NET v4.0 then press OK.

Step 6: Click on connect as.. button choose specific user -> press set..

Step 7: Provide your window user log in credential and press OK.

Step 8: After that Test Settings and press Close and OK.

Step 9: Now browse
your application through following navigation. Right click application ->Manage Application -> Browse.

This last step will open a browser window in front of you, where you will see your web application start page. Now your hosted application is ready to use....enjoy!
https://www.youtube.com/watch?v=C8oykuBC0HA&t=2s
Thursday, 1 August 2013
Custom Auto Suggest and filter dropdownlist.
hello friends,
https://www.youtube.com/watch?v=C8oykuBC0HA&t=2s
Today i gonna show you some great utility controls and API which make your web site a delight experience for visitors n users.
(1)When you a have very long list of items to display in a dropdown list in that case these below great control serves awesome utility of auto-suggestion and filtering of item on the basis of text or alphabet typed by user.
<html xmlns="http://www.w3.org/1999/xhtml">
<head runat="server">
<title></title>
<link rel="stylesheet"
href="http://code.jquery.com/ui/1.10.3/themes/smoothness/jquery-ui.css"
/>
<script src="http://code.jquery.com/jquery-1.9.1.js"></script>
<script src="http://code.jquery.com/ui/1.10.3/jquery-ui.js"></script>
<link rel="stylesheet"
href="/resources/demos/style.css"
/>
<style type="text/css">
.custom-combobox {
position: relative;
display: inline-block;
}
.custom-combobox-toggle {
position: absolute;
top: 0;
bottom: 0;
margin-left: -1px;
padding: 0;
/* support: IE7 */
*height: 1.2em;
*top: 0.1em;
}
.custom-combobox-input {
margin: 0;
padding: 0.1em;
width: auto;
overflow:scroll;
font-family:Arial;
font-size:14;
}
</style>
<script type="text/javascript">
(function ($) {
$.widget("custom.combobox",
{
_create: function () {
this.wrapper = $("<span>")
.addClass("custom-combobox")
.insertAfter(this.element);
this.element.hide();
this._createAutocomplete();
this._createShowAllButton();
},
_createAutocomplete: function () {
var selected = this.element.children(":selected"),
value = selected.val() ? selected.text() : "";
this.input = $("<input>")
.appendTo(this.wrapper)
.val(value)
.attr("title", "")
.addClass("custom-combobox-input
ui-widget ui-widget-content ui-state-default ui-corner-left")
.autocomplete({
delay: 0,
minLength: 0,
source: $.proxy(this, "_source")
})
.tooltip({
tooltipClass: "ui-state-highlight"
});
this._on(this.input,
{
autocompleteselect: function (event, ui) {
ui.item.option.selected = true;
this._trigger("select",
event, {
item:
ui.item.option
});
},
autocompletechange: "_removeIfInvalid"
});
},
_createShowAllButton: function () {
var input = this.input,
wasOpen = false;
$("<a>")
.attr("tabIndex", -1)
.attr("title", "Show All Items")
.tooltip()
.appendTo(this.wrapper)
.button({
icons: {
primary: "ui-icon-triangle-1-s"
},
text: false
})
.removeClass("ui-corner-all")
.addClass("custom-combobox-toggle
ui-corner-right")
.mousedown(function () {
wasOpen = input.autocomplete("widget").is(":visible");
})
.click(function () {
input.focus();
// Close if already visible
if (wasOpen) {
return;
}
// Pass empty string as value to search
for, displaying all results
input.autocomplete("search",
"");
});
},
_source: function (request, response) {
var matcher = new
RegExp($.ui.autocomplete.escapeRegex(request.term), "i");
response(this.element.children("option").map(function
() {
var
text = $(this).text();
if
(this.value && (!request.term ||
matcher.test(text)))
return {
label: text,
value: text,
option: this
};
}));
},
_removeIfInvalid: function (event, ui) {
//
Selected an item, nothing to do
if (ui.item) {
return;
}
// Search for a match (case-insensitive)
var value = this.input.val(),
valueLowerCase
= value.toLowerCase(),
valid = false;
this.element.children("option").each(function
() {
if
($(this).text().toLowerCase() ===
valueLowerCase) {
this.selected = valid = true;
return false;
}
});
// Found a match, nothing to do
if (valid) {
return;
}
// Remove invalid value
this.input
.val("")
.attr("title", value + " didn't match any item")
.tooltip("open");
this.element.val("");
this._delay(function
() {
this.input.tooltip("close").attr("title",
"");
}, 2500);
this.input.data("ui-autocomplete").term
= "";
},
_destroy: function () {
this.wrapper.remove();
this.element.show();
}
});
})(jQuery);
$(function () {
$("#ddlanguages").combobox();
});
</head>
<body>
<form id="form1" runat="server">
<div>
<asp:DropDownList ID="ddlanguages"
ClientIDMode="Static"
runat="server">
<asp:ListItem Text=""></asp:ListItem>
<asp:ListItem Text="ActionScript"></asp:ListItem>
<asp:ListItem Text="AppleScript"></asp:ListItem>
<asp:ListItem Text="Asp"></asp:ListItem>
<asp:ListItem Text="BASIC"></asp:ListItem>
<asp:ListItem Text="C"></asp:ListItem>
<asp:ListItem Text="C++"></asp:ListItem>
<asp:ListItem Text="Clojure"></asp:ListItem>
<asp:ListItem Text="COBOL"></asp:ListItem>
<asp:ListItem Text="ColdFusion"></asp:ListItem>
<asp:ListItem Text="Erlang"></asp:ListItem>
<asp:ListItem Text="Fortran"></asp:ListItem>
<asp:ListItem Text="Groovy"></asp:ListItem>
<asp:ListItem Text="Haskell"></asp:ListItem>
<asp:ListItem Text="Java"></asp:ListItem>
<asp:ListItem Text="JavaScript"></asp:ListItem>
<asp:ListItem Text="Lisp"></asp:ListItem>
<asp:ListItem Text="Perl"></asp:ListItem>
<asp:ListItem Text="PHP"></asp:ListItem>
<asp:ListItem Text="Python"></asp:ListItem>
<asp:ListItem Text="Ruby"></asp:ListItem>
<asp:ListItem Text="Scala"></asp:ListItem>
<asp:ListItem Text="Scheme"></asp:ListItem>
</asp:DropDownList>
</div>
</form>
</body>
</html>
Subscribe to:
Posts (Atom)